


|
|
|
Overview | |
|---|
Note: in command examples, user input is shown using a bold font,
and command output using a normal font.
To illustrate the use of MRtrix applications from the command-line, we start with the simple program mrinfo. This program simply prints out relevant header information found in the image specified. For example:
> mrinfo image.img
************************************************
Image:               "image.img"
************************************************
  Format:            Analyse 7.5
  Dimensions:        192 x 256 x 256
  Voxel size:        0.9 x 0.898438 x 0.898438
  Dimension labels:  0. left->right (mm)
                     1. posterior->anterior (mm)
                     2. inferior->superior (mm)
  Data type:         unsigned 16 bit integer (little endian)
  Data layout:       [ +0 +1 +2 ]
  Data scaling:      offset = 0, multiplier = 1
  Comments:          Example image
  Transform:                  1         0         0     -86.4
                              0         1         0      -115
                              0         0         1      -115
                              0         0         0         1
In this case, the image is in Analyse format, identified by the extension .img. MRtrix applications support a variety of image file formats.
Detailed information on a particular command can be obtained using the -help option. For example:
> mrinfo -help
mrinfo: part of the MRtrix package

PURPOSE:  display header information

SYNTAX:   mrinfo [ options ] image [ image ... ]

            image       the input image.

OPTIONS:

  -grad file    write DW gradient scheme to file
                "file": the DW gradient scheme file.

  -dicom        print all DICOM entries.

  -csa          print all CSA entries (Siemens DICOM only.

  -info         display information messages.

  -quiet        do not display information messages or progress status.

  -debug        display debugging messages.

  -help         display this information page and exit.

  -version      display version information and exit.
Another useful command is mrconvert. Here is a typical example:
> mrconvert /data/DICOM_folder/ image.img
mrconvert: copying data... 100%
This will convert the DICOM data stored in the /data/DICOM_folder/ folder into the Analyse format image image.img.
The user will be prompted to select the relevant image series if several are found.
There are many useful options for mrconvert. For example:
> mrconvert /data/DICOM_folder/ -datatype float32 -coord 2 10:30 image.img
mrconvert: copying data... 100%
This will instruct mrconvert to convert the data as before, but the intensity values in the resulting image will be stored as 32-bit floating-point values, and the image will only contain slices 10 through to 30 (more details on specifying such sequences of numbers are given here)
MRtrix includes a viewing tool, invoked by issuing the command mrview. MRView can optionally take one or more image specifier as an argument. For example:
> mrview image.img
should open a window similar to the following:
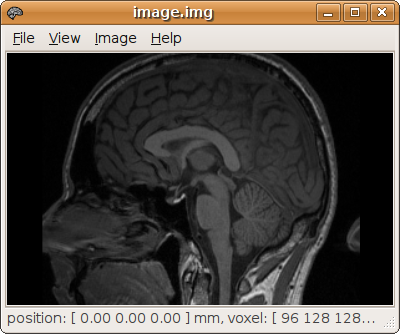
Alternatively, images can be opened using the File->Open menu. More detailed information about MRView can be found here.
All MRtrix applications will consistently use the same coordinate system. Note that this frame of reference differs from the DICOM standard. The convention followed by MRtrix applications is as follows:
| dimension | description |
|---|---|
| 0 (x) | increasing from left to right |
| 1 (y) | increasing from posterior to anterior |
| 2 (z) | increasing from inferior to superior |
All coordinates or vector components supplied to MRtrix applications must be provided with reference to this coordinate system.
All MRtrix programs are based on the same underlying infrastructure for image access, and should all be capable of handling all supported image formats. In addition, programs can be connected via pipes such that the data produced by one program can be used immediately by another. In this way, a series of sequential operations can be performed by typing a single command (see Data pipes for details). Finally, each program supports a number of standard command-line options that are explained here.
Note that none of the MRtrix programs will overwrite any existing image files to avoid unintentional loss of data. If you need to overwrite a file, you will need to delete it manually before invoking the command to write the new version.
Note also that pixel coordinates and study numbers start from zero. For example, the first study in a data set is labelled as study 0, the second as study 1, etc. and valid pixel coordinates for a 128x128 image range from 0 to 127.
|
|
|
top | |
|---|